
AI - Handwritten Digit Recognition
In this project, we built an AI model to recognize handwritten digits (0-9) using deep learning. Using the MNIST dataset, a collection of 28x28 grayscale images, we trained the model with TensorFlow and Keras. The best part? It runs completely free on Google Colab, making it easy for anyone to get started.
Technologies Used
- Python
- TensorFlow / Keras
- Matplotlib
- OpenCV
- NumPy
In this comprehensive guide, we will walk you through building your own Handwritten Digit Recognition AI from scratch. The process includes setting up the environment, processing the MNIST dataset, training the model using deep learning techniques, and testing its accuracy. With Python, TensorFlow, and Keras, you'll create a powerful system capable of recognizing handwritten digits with high precision.
Why Build This AI?
The AI has several real-world uses, such as:
- Digitizing handwritten documents.
- Automated form processing (e.g., bank cheques, invoices).
- Postal address recognition for mail sorting.
- Assisting visually impaired users with handwriting recognition.
Let's Build It
Installing the Library
!pip install tensorflow numpy matplotlib
Build the Code
- Why Normalization? Helps neural networks train faster and perform better.
- Why Expand Dimensions? CNNs require a (Height, Width, Channels) format.
import tensorflow as tf
import numpy as np
import matplotlib.pyplot as plt

# Load MNIST dataset (small size, built-in)
(x_train, y_train), (x_test, y_test) = tf.keras.datasets.mnist.load_data()

# Normalize pixel values (0-255 → 0-1)
x_train, x_test = x_train / 255.0, x_test / 255.0

# Expand dimensions for CNN input (28x28 → 28x28x1)
x_train = np.expand_dims(x_train, axis=-1)
x_test = np.expand_dims(x_test, axis=-1)

# Show sample images
plt.figure(figsize=(10, 5))
for i in range(10):
    plt.subplot(2, 5, i + 1)
    plt.imshow(x_train[i].squeeze(), cmap="gray")
    plt.title(f"Label: {y_train[i]}")
    plt.axis("off")
plt.show()
- Conv2D layers: Extract features from images.
- MaxPooling2D: Reduces image size while preserving key features.
- Flatten layer: Converts extracted features into a single vector.
- Dense layers: Fully connected layers to classify digits.
from tensorflow.keras.models import Sequential
from tensorflow.keras.layers import Conv2D, MaxPooling2D, Flatten, Dense

# Define CNN model
model = Sequential([
    Conv2D(32, (3,3), activation="relu", input_shape=(28,28,1)),
    MaxPooling2D(2,2),
    Conv2D(64, (3,3), activation="relu"),
    MaxPooling2D(2,2),
    Flatten(),
    Dense(128, activation="relu"),
    Dense(10, activation="softmax")  # 10 output classes (digits 0-9)
])

# Compile the model
model.compile(optimizer="adam", loss="sparse_categorical_crossentropy", metrics=["accuracy"])

# Show model summary
model.summary()
Training the Model
- Epochs: Number of times the model learns from the dataset.
- Batch size: Number of images processed at once.
history = model.fit(x_train, y_train, validation_data=(x_test, y_test), epochs=30, batch_size=64)
Testing the Model
- Evaluates the model: Tests the model on unseen data.
- Typically achieves 98%+ accuracy: High accuracy on the MNIST dataset.
test_loss, test_acc = model.evaluate(x_test, y_test)
print(f"Test Accuracy: {test_acc*100:.2f}%")
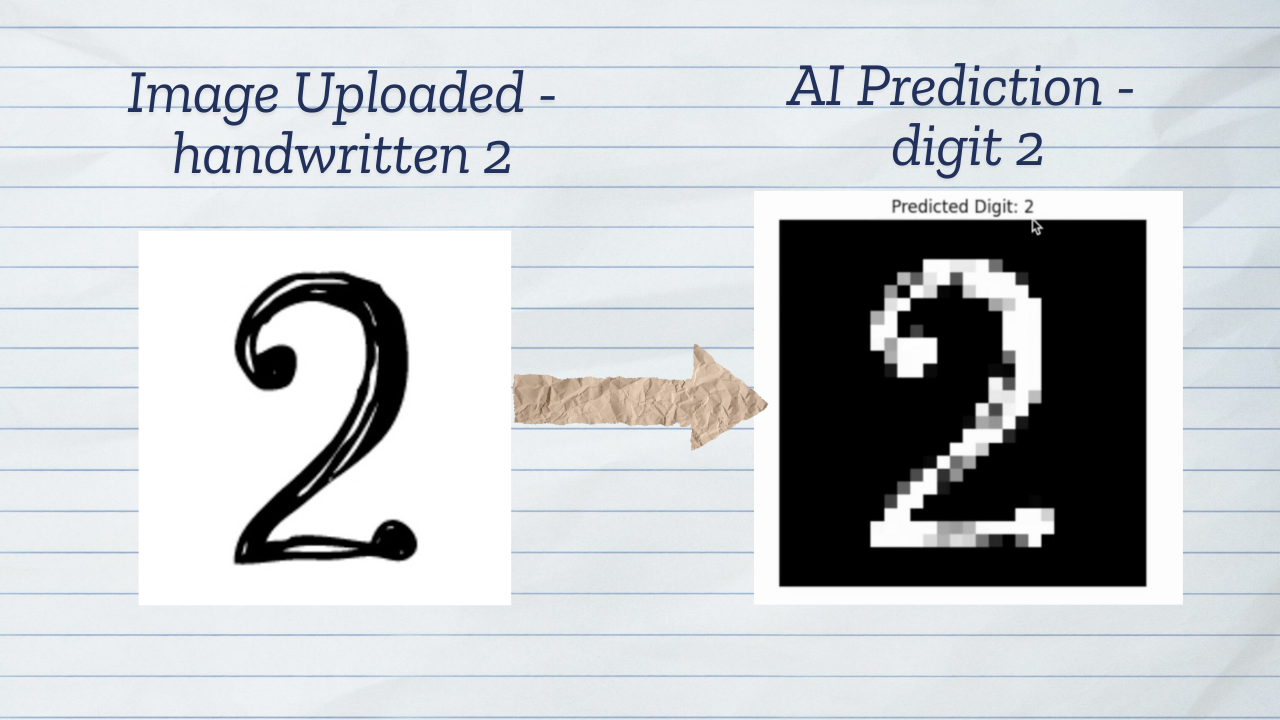
Uploading and Predicting Custom Images
- Reads uploaded image: Converts to grayscale, resizes, and normalizes.
- Inverts colors if needed: Resolves the white background issue.
- Uses trained CNN model: Predicts the digit from the processed image.
from google.colab import files
from tensorflow.keras.preprocessing import image
import cv2

# Function to preprocess and predict
def predict_digit(img_path):
    import cv2
    import numpy as np
    from tensorflow.keras.preprocessing import image

    # Load image in grayscale
    img = cv2.imread(img_path, cv2.IMREAD_GRAYSCALE)

    # Invert colors if needed
    if np.mean(img) > 127:  # If background is white, invert colors
        img = cv2.bitwise_not(img)

    # Resize to match MNIST (28x28)
    img = cv2.resize(img, (28,28))

    # Normalize pixel values
    img = img / 255.0

    # Expand dimensions for CNN input (Batch size, Height, Width, Channels)
    img = np.expand_dims(img, axis=[0, -1])

    # Make a prediction
    prediction = model.predict(img)
    digit = np.argmax(prediction)

    # Display the image with the prediction
    plt.imshow(img.squeeze(), cmap="gray")
    plt.title(f"Predicted Digit: {digit}")
    plt.axis("off")
    plt.show()

    return digit

# Upload and classify
from google.colab import files
uploaded = files.upload()
for img_path in uploaded.keys():
    predict_digit(img_path)